Product Review: Menu Planner App
Guest review by Michele Pink, Accredited Practising Dietitian
I am a big believer in menu planning for a number of different reasons: menu planning saves money, makes healthy eating easier, decreases stress levels, saves time, encourages variety in eating and allows you to take into account life's busy times. So when the opportunity arose to investigate a new menu planner App, called 'Menu Planner', I jumped at the chance.
I have been menu planning for a long time now and usually plan a month's worth of meals in advance on an Excel template. Although this has worked well for me, I also welcome something more flexible as it allows for those last minute unexpected events. I grew up in a house with eight kids, so my mother had to be pretty organised. I can remember her saying that the hardest thing about dinner was thinking about what to have. Now with four children of my own, I can relate to this. As long as the meal for the evening is already worked out ahead, I make sure that I have the ingredients on hand and can quickly go about prepping dinner in advance when I can. If menu planning is not something you are in the habit of doing then I encourage you to give it a try. Maybe this App is just what you need to get started.
How to get started
There are 4 basic steps to get up and running:
Step 1. Download the App
The App can be easily downloaded from the iTunes or App store for $2.99 and is suitable for both iPhone and iPad.
Step 2. Enter Recipes and Food Items
Step 3. Plan your Meals
Step 4. View Shopping List
Step 2: Entering Recipes and Food Items
 Entering recipes takes a bit of time to set up but well worth the effort. Once you have your recipes added you can easily view the recipe straight from your device without having to hunt around for recipe books.
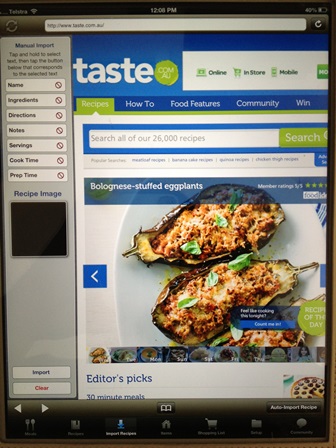
To get started you need to spend some time adding your favourite recipes either by importing them from supported websites of which there are a lot to choose, or by manually importing them from other websites that aren't compatible with the App. Either way I have found both to be relatively easy to do. Alternatively you can type in any recipe as well into a recipe template.

You can also add in single food items such as cereals or crackers. Which is handy if you are planning out all your meals for the day, not just dinner.
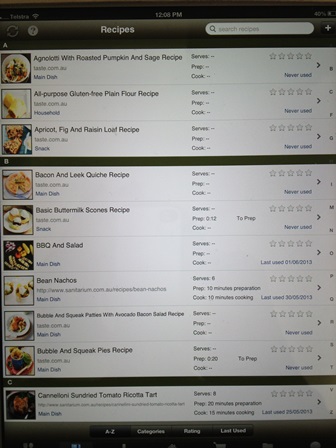 You can view all your recipes with the option of a photo image to remind you, which is a bonus when you are picking out meals for the week. When adding a recipe make sure you assign a category for it such as Main Dish, Snack, Dessert etc. This will make a difference later because you'll be able to view the recipes either alphabetically or categorically.
Step 3: Planning Meals
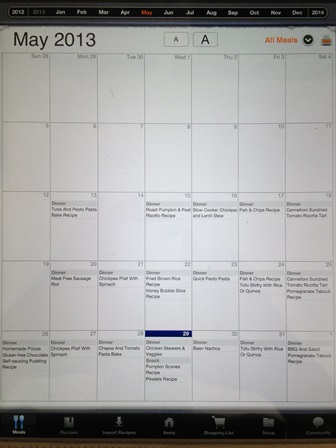
The meal planning section allows you to view the planner by either day, week or month. You can see a month's view of my meals in the picture.
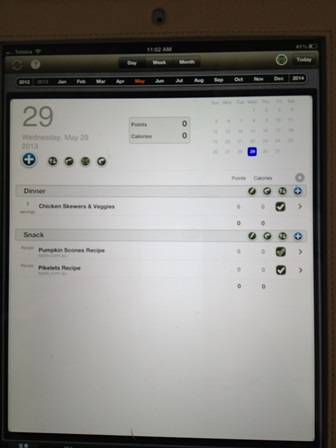
When planning for each day you can add in any meal type i.e. breakfast, lunch, dinner or snack, and then add in any recipe or food item that you would like to have from your list.
Once your meals are planned you can either print it off (if you have a printer that supports AirPrint_ or email it as a PDF).
Step 4: Create your Shopping List and Pantry Tracking
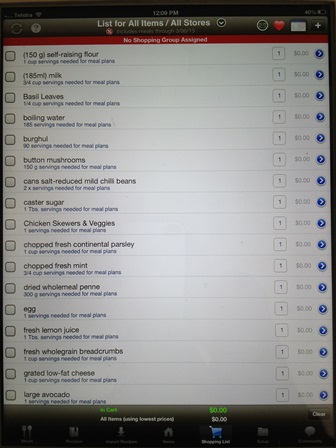 You can generate a shopping list from your meal plans. All you need to do is to select the date range you want and then import. The App then creates a shopping list, listing all the ingredients and quantities you need. Again you can email this list to yourself. I couldn't find a print option for the shopping list which was a little surprising given that this option was available for the meal plans. I'd love to see this added in a future update.
When setting up the Menu Planner, you have the option of an Advanced Pantry Tracking. This allows you to track which foods and ingredients you already have on hand in your panty as well as keep track of how much of each item you have. If you only want to track whether or not you have an item on hand, and don't want to track quantities then you don't need to turn on the Advanced Pantry Tracking option.
I can see how useful this option could be, however it's very cumbersome to set up and maintain. At this stage I don't use this option mainly due to time constraints plus generally I have a good handle on how much of most products I have in our pantry. All I am interested to know is what key ingredients I need for the week to add to my shopping list.
The bottom line - Overall rating 8/10
In a nutshell I think this App is a very good tool. It is excellent, whether you are planning meals for a family or individually. Other Menu Planner Apps I have tried often restrict you to the recipes they have incorporated into the App, which I find doesn't suit my family. I like the option of being able to add the recipes I know my family will eat and enjoy. It does take a bit of time and commitment to set up, but once that is done then it is pretty quick to use. Having just got it going myself, I am sure there are more features to this App that I am not using to its full potential, such as recording calories and points. However, over time I am sure that I will become more familiar with it.
There is a support website (http://menu-planner.com) that offers tutorials which I would highly recommend to any new user as they can save a lot of time. The website also allows you to log into the customer site where you can add recipes via your PC which can be a bit quicker for some people than working on their iPhone or iPad. Once loaded, just sync it with your devices which is another plus.


